A Cool Little Appointment Reminder for Windows
by Jack Dunning
 There are times when you
make appointments that you absolutely don't want to miss. That is when
it is handy to have a quick reminder—both easy to set up and use—that
will pop up in the middle of your computer screen screaming at you to
get moving. This type of alarm is especially useful if you are the type
of person who immerses yourself in your work (or play) oblivious to the
rest of the world. I set about the task of finding an AutoHotkey
reminder script that would do just that.
There are times when you
make appointments that you absolutely don't want to miss. That is when
it is handy to have a quick reminder—both easy to set up and use—that
will pop up in the middle of your computer screen screaming at you to
get moving. This type of alarm is especially useful if you are the type
of person who immerses yourself in your work (or play) oblivious to the
rest of the world. I set about the task of finding an AutoHotkey
reminder script that would do just that.While I'm sure that there is one out there somewhere, I didn't find a reminder script that was both simple to use and easy to code. I decided to write one myself keeping complication to a minimum. I liked the idea of writing an AutoHotkey script which schedules a reminder at a later time in the day because it would shows both the flexibility and power of the scripting language. This reminder app is not the usual text substitution that most people think of when working with AutoHotkey.
The Reminder App
The reminder script is basic in its function. Press the hotkey combination CTRL+
 +R (R for
reminder) and a setup window pops up. It uses both the GUI (Graphic
User Interface) command for picking a time and adding a message, then
sets a timer for a pop-up to appear at a later time in the same day
(see Figure 1).
+R (R for
reminder) and a setup window pops up. It uses both the GUI (Graphic
User Interface) command for picking a time and adding a message, then
sets a timer for a pop-up to appear at a later time in the same day
(see Figure 1).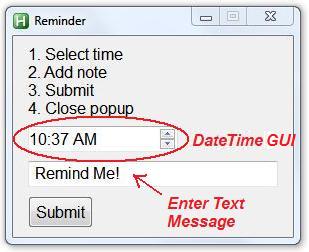
Figure 1. Select a time later the same day and enter a message to set the reminder.
After clicking the Submit button a confirmation window pops up showing the new reminder (see Figure 2). If you accidentally select a time earlier than now, then a different window pops up explaining that you need to pick a later time. In its first form, the reminder can only be set up to midnight, but I explain later in this column what's necessary to make it a 24-hour reminder. Also, since it is sitting in memory unsaved, if you shut down the computer, the reminder will be lost. I'm sure that it can be saved in a file to add persistence to the reminder system, but that's a more advanced topic suitable for a later time.
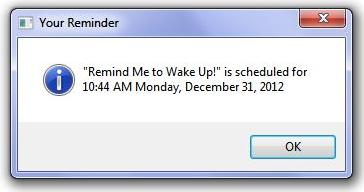
Figure 2. The pop-up tells you when the reminder will occur.
This AutoHotkey reminder script is a simple scheduler for one quick and easy prompt. If you try to schedule a second reminder, it will overwrite the first. (Adding multiple reminders is another more advanced topic.) When the scheduled time arrives, another window pops up displaying the reminder (see Figure 3). It both chimes (if the audio is turned on) and the window stays always-on-top until it is closed.
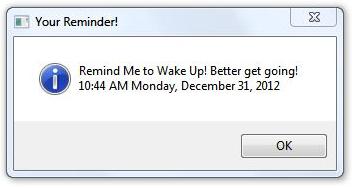
Figure 3. The reminder pops up at the scheduled time and stays always-on-top until it is closed.
Writing the Reminder Script
If you are new to AutoHotkey, you may want to check out our Web page for getting started, "Installing AutoHotkey and Writing Your First Script."
 Even if you have never used
most of them, it is worthwhile to be familiar with what AutoHotkey
commands are available. It's like knowing what's in your toolbox. The
first step for me was figuring out how I could set an alarm. I looked
for a command which would could set a clock time at which it would
launch a routine. That requires a function which continuously checks
the clock until the appointed time. I didn't find a scheduling command
in AutoHotkey that checked the clock.
Even if you have never used
most of them, it is worthwhile to be familiar with what AutoHotkey
commands are available. It's like knowing what's in your toolbox. The
first step for me was figuring out how I could set an alarm. I looked
for a command which would could set a clock time at which it would
launch a routine. That requires a function which continuously checks
the clock until the appointed time. I didn't find a scheduling command
in AutoHotkey that checked the clock.However, I did find the SetTimer command which is similar to a kitchen timer for soft-boiled eggs. With the SetTimer command a routine can be scheduled to run a routine a specific number of microseconds later. To use this command for the reminder script I needed to know the current time, the scheduled time, and the difference between the two in microseconds.
Fortunately, AutoHotkey includes a data/time specific GUI command:
Gui, Add, DateTime, [time variable, format]
This GUI, DateTime command allows the entering of a scheduled time by either direct editing or using the up and down arrows on the right side of the interface as shown in Figure 1. Without this date/time gadget, the problem would be much more difficult. It's important to note that even though only the time can be entered in the pop-up shown in Figure 1, both the date and time are saved to the variable.
The problem with the date/time variable is that it uses the Year/Month/Day/Hour/Minute/Second format as described in Chapter Seven of A Beginner's Guide to AutoHotkey and shown in Figure 4. But to set the timer the time delay must be in microseconds. Subtracting the current time from the scheduled time in the standard date/time format will yield nonsense since the seconds, minutes, and hours are all in odd increments (24 hours, 60 minutes, and 60 seconds). First, both times need converting to seconds before finding the time interval (the difference between current time and scheduled time).
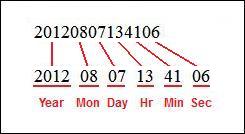
Figure 4. The computer sees the date/time as digits from the year down to the second.
Since I'm only dealing with the current day, I can calculate the number of seconds in both the current time and scheduled time by adding the seconds (the last two digits in the time variable) to the minutes multiplied by 60 seconds (the second to last two digits in the time variable times 60 seconds) plus the hours multiplied by 3600 seconds, (the third to last two digits in the time variable times 60 minutes times 60 seconds). The difference between the scheduled time and current will give me the delay needed in seconds. Since, the SetTimer command uses microseconds, multiply the seconds by 1000.
Once this logic is worked out, it's a matter of putting the script together.
The Reminder.ahk Script
As usual I put in the code for creating the pop-up first (Figure 1):
^#R::

Gui, Font, s12, Arial
Gui, Add, Text,, 1. Select time`n2. Add note`n3. Submit`n4. Close popup
Gui, Add, DateTime, vMyTime w150 1, hh:mm tt
Gui, Add, Edit, vMyNote w250, Remind Me!
Gui, Add, Button, Default, Submit
Gui, Show,  , Reminder
Return
The first line creates the hotkey combination CTRL+
+R (^#R) for activating the reminder.ahk script.The second line (Gui, Font, s12, Arial) formats the text in the pop-up as described in Chapter Nineteen of the book Digging Deeper into AutoHotkey.
The third line of code (Gui, Add, Text,, 1. Select time`n2. Add note`n3. Submit`n4. Close popup) adds the short list of instructions for the pop-up. Note that the "`n" is the special character for creating a new line.
The fourth line of code (Gui, Add, DateTime, vMyTime w150 1, hh:mm tt) adds the DateTime function to the GUI. The "vMyTime" creates the variable MyTime which stores the scheduled time when the Submit button is clicked. The "w150" sets the width of the time editing field.
By default the DateTime GUI has a dropdown calendar associated with it, but since we don't need or want a calendar with this app, the number "1" appearing in the options replaces the dropdown calendar with the up-down control on the right. The format "hh:mm tt" provides input fields for hours, minutes, and AM or PM. Note that there is no gLabel included to launch a subroutine. The reason for this is the DateTime GUI would immediately trigger the label every time it detected a change which is far too often for our purposes here. Instead a Submit button and routine are used.
The fifth line of code (Gui, Add, Edit, vMyNote w250, Remind Me!) adds the edit field for the reminder text. The text is stored in the variable MyNote when the Submit button is clicked. The "w250" sets the width of the field. "Remind Me!" is the default value appearing in the field.
The sixth line of code (Gui, Add, Button, Default, Submit) adds the Submit button to the GUI which initiates the action when clicked.
The last line of code (Gui, Show, , Reminder) before the "Return" marks the end of the GUI portion of the script displaying the pop-up with the title "Reminder."
Adding the Action
The remaining code may look a little intimidating to the novice script writer, but, once broken down, it is relatively simple. There are three subroutine: "ButtonSubmit:" the default routine for clicking the Submit button; "GuiClose:" which deletes the original pop-up so you can rerun it without causing an error; and "ShowReminder:" which is the label for activating the reminder at the preset time. The entire routine for setting up the reminder triggered by clicking the Submit button is as follows:
ButtonSubmit:
Gui, Submit, NoHide

If (MyTime > A_Now)
  {
    FormatTime, HrTime , %MyTime%, HH
    FormatTime, MinTime , %MyTime%, m
    FormatTime, SecTime , %MyTime%, s
    NewTime := ((HrTime*3600 + MinTime*60 + SecTime)
                        - (A_Hour*3600 + A_Min*60 + A_Sec))*1000
    FormatTime, Schedule, %MyTime%
    MsgBox,4160,Your Reminder, "%MyNote%" is scheduled for`n%Schedule%
    #Persistent
    RemMessage := "Better get going!"
    SetTimer, ShowReminder, %NewTime%
  }
Else
  {
    MsgBox, The time must be later in the same day!
    GuiControl,,MyTime, %A_Now%
  }
Return

GuiClose:
Gui, Destroy
Return

ShowReminder:
FormatTime, RightNow
MsgBox,4160,Your Reminder!, %MyNote% %RemMessage%`n%RightNow%
SetTimer, ShowReminder, Off
Return
In the "ButtonSubmit:" routine, the first line of code (Gui, Submit, NoHide) stores the set time to the variable MyTime. The NoHide parameter keeps the pop-up visible and available for change until it is closed by clicking the X in the upper right-hand corner of the GUI.
Next, based upon the set time, the "IF" conditional is used to determine if the scheduled time is a later time or earlier time by comparing the current time (A_Now) to the time stored in MyTime. If the user accidentally inputs an earlier time, then there is not point in continuing with setting the appointment. Thus the "ELSE" portion of the conditional displays a message (MsgBox, The time must be later in the same day!) stating the problem and replaces the time displayed in the pop-up with the current time (GuiControl,,MyTime, %A_Now%). Since the pop-up doesn't display seconds, it is often necessary to increment at least one minute forward to set an appointment.
If you decide that you want to make this routine a true 24-hour reminder, then you must change the "ELSE" portion of the conditional to the same code as the "TRUE" portion and add 24 hours worth of seconds to the calculation (60 seconds per minute times 60 minutes per hour times 24 hours per day) prior to the microsecond conversion.
The "TRUE" portion of the "IF" conditional checks for a time later than the current time (If (MyTime > A_Now)). If MyTime is greater than (>) the current time (A_Now) then the condition is TRUE. The selected time must be converted to seconds. To do this, the number of hours, minutes and seconds needs to be parsed and store to variables using the FormatTime command:
    FormatTime, HrTime , %MyTime%, HH
    FormatTime, MinTime , %MyTime%, m
    FormatTime, SecTime , %MyTime%, s
The variables HrTime, MinTime, and SecTime store the hours, minutes, and seconds found in the set time variable MyTime respectively. Then each is multiplied by the appropriate number to convert to seconds, then added together to get the total number of seconds (HrTime*3600 + MinTime*60 + SecTime).
Using the variables for the current hour, minute, and second, the current time is converted to the total number of seconds (A_Hour*3600 + A_Min*60 + A_Sec). This value is subtracted from the set time number of seconds, then multiplied by 1000 to convert to microseconds and stored in the variable NewTime (NewTime := ((HrTime*3600 + MinTime*60 + SecTime) - (A_Hour*3600 + A_Min*60 + A_Sec))*1000).
NewTime is the value in microseconds needed for the SetTimer command (SetTimer, ShowReminder, %NewTime%). ShowReminder is the label for the routine to pop-up the Reminder window. At NewTime the subroutine ShowReminder will activate.
Prior to setting the timer, a pop-up window using the AutoHotkey MsgBox command activates which confirms the time of the reminder (MsgBox, 4160, Your Reminder, "%MyNote%" is scheduled for`n%Schedule%). The number "4106" indicates the type of window to open and makes it always-on-top as described in the "Making an AutoHotkey Help Window" section of Chapter Eleven of the book A Beginner's Guide to AutoHotkey. The title of the window is "Your Reminder" with the input text (MyNote) and the time that it is scheduled as shown in Figure 2 above.
When the term "#Persistent" is added to a routine, it will continue to run even if an EXIT is executed. This is commonly used in routines using SetTimer to prevent it from prematurely terminating even after the pop-up is closed.
The next line (RemMessage := "Better get going!") is completely optional and adds nothing to the logic of the routine. It is merely a personal prompt.
Waiting for the Reminder
Once the timer is set (SetTimer, ShowReminder, %NewTime%) both of the open windows can be closed. At the appointed time the label ShowReminder will activate.
ShowReminder:
FormatTime, RightNow
MsgBox,4160,Your Reminder!, %MyNote% %RemMessage%`n%RightNow%
SetTimer, ShowReminder, Off
Return
The current time and date will be stored in the default format to RightNow using the FormatTime command.
Then in the same format as previously discussed the MsgBox command displays the reminder (MsgBox, 4160, Your Reminder!, %MyNote% %RemMessage%`n%RightNow%).
The SetTimer command is used to disable the timer. Otherwise, it would repeat the routine activation at the same time interval. The repeat of SetTimer can be disabled by making the interval in microseconds a negative number.
The complete AutoHotkey code for the Reminder.ahk program is as follows:
^#R::

Gui, Font, s12, Arial
Gui, Add, Text,, 1. Select time`n2. Add note`n3. Submit`n4. Close popup
Gui, Add, DateTime, vMyTime w150 1, hh:mm tt
Gui, Add, Edit, vMyNote w250, Remind Me!
Gui, Add, Button, Default, Submit
Gui, Show,  , Reminder
Return

ButtonSubmit:
Gui, Submit, NoHide

If (MyTime > A_Now)
  {
    FormatTime, HrTime , %MyTime%, HH
    FormatTime, MinTime , %MyTime%, m
    FormatTime, SecTime , %MyTime%, s
    NewTime := ((HrTime*3600 + MinTime*60 + SecTime)
                        - (A_Hour*3600 + A_Min*60 + A_Sec))*1000
    FormatTime, Schedule, %MyTime%
    MsgBox,4160,Your Reminder, "%MyNote%" is scheduled for`n%Schedule%
    #Persistent
    RemMessage := "Better get going!"
    SetTimer, ShowReminder, %NewTime%
  }
Else
  {
    MsgBox, The time must be later in the same day!
    GuiControl,,MyTime, %A_Now%
  }
Return

GuiClose:
Gui, Destroy
Return

ShowReminder:
FormatTime, RightNow
MsgBox,4160,Your Reminder!, %MyNote% %RemMessage%`n%RightNow%
SetTimer, ShowReminder, Off
Return
You can copy-and-paste this code into an AutoHotkey script, run it, then set a reminder with the hotkey combination CTRL+
+R.Reminder.ahk Notes
As previously mentioned, if you would like to make the reminder script a full 24-hour script, then it is necessary to add 24 hours worth of microseconds to time which occurs before the current time. The Else portion of the IF conditional could be changed as follows:
    FormatTime, HrTime , %MyTime%, HH
    FormatTime, MinTime , %MyTime%, m
    FormatTime, SecTime , %MyTime%, s
    NewTime := (((HrTime*3600 + MinTime*60 + SecTime)
                        - (A_Hour*3600 + A_Min*60 + A_Sec))*1000)+86400000
    FormatTime, Schedule, %MyTime%, h:mmtt
    MsgBox,4160,Your Reminder, "%MyNote%" is scheduled for`nTomorrow at %Schedule%
    #Persistent
    RemMessage := "Better get going!"
    SetTimer, ShowReminder, %NewTime%
Note that 86400000 microseconds (24 hours) have been added to NewTime. Plus the FormatTime is changed to reflect only the hour and minutes with AM or PM. This is done because it's easier to just add "Tomorrow" to the MsgBox message, than calculating the date for the next day—especially if you're on the last day of the month. For now you need to take my word for it, because it is beyond the scope of this particular column. If you want future days as reminder options, then add the drop down calendar back into the DateTime GUI. It will be easier than writing a function to do the obtuse calendar math. However, you will need to convert days (in the form of YDay—day of the year, bypassing months) into your microseconds calculations. (I'm sure that there are better options for long-term appointments.)
If you want to include multiple reminders, then you will need multiple labels (ShowReminder1, ShowReminder2, etc.) and set up a way to track which are in effect so you don't overwrite them. It appears that you can't use a variable for the label at the head of the routine itself, which means adding separate routines for each reminder—even if the code is identical. Possibly a function could be used within the label, but again I haven't tried that and it's beyond the scope of this column.
Another weakness of this reminder routine is that it sits in memory. If you restart your computer, you lose your reminder. There are ways to make it more robust which include saving the basic information to a file. I see that the commands are available in AutoHotkey for getting this done, but it is an advanced topic which I will save that for another time.
If you would like to test the compiled version of the 24 hour reminder (Reminder.exe), it can be found at the ComputorEdge AutoHotkey Free Script and Apps page. Download Reminder.exe and double-click to load. Use CRTL+
+R to
activate. Check the confirmation window for either today's date or the
word "Tomorrow" to confirm when the reminder will actually happen—if
you don't turn off your computer first.