
The Use and Images of AutoHotkey GUI Control Popup Windows
"What AutoHotkey Pop-ups Look Like!"
By Jack Dunning
Some of the post powerful tools in AutoHotkey are the GUIs (Graphical User Interface—pronounced "gooey"). These are pop-up window controls built into AutoHotkey which make
 slapping together applications much easier.
The power of GUI controls is that they turn what could be a complicated
programming task into a relatively simple scripting problem. When
various GUI controls are combined, they become creative applications. A
list of these GUI
controls can be found at the
AutoHotkey Web site; however, there are no images displaying what
they look like. This is unfortunate since just seeing one can spark
many
ideas for scripts and applications. When a GUI window is object is
viewed, its potential in a script is often immediately apparent. All of
the GUIs come with options
for tailoring features and functions.
slapping together applications much easier.
The power of GUI controls is that they turn what could be a complicated
programming task into a relatively simple scripting problem. When
various GUI controls are combined, they become creative applications. A
list of these GUI
controls can be found at the
AutoHotkey Web site; however, there are no images displaying what
they look like. This is unfortunate since just seeing one can spark
many
ideas for scripts and applications. When a GUI window is object is
viewed, its potential in a script is often immediately apparent. All of
the GUIs come with options
for tailoring features and functions.The purpose of this page is to show how the various GUI controls look by displaying images from some of the educational scripts I've written. Most of these scripts can be found at the ComputorEdge AutoHotkey Free Scripts and Apps page. Once you view them, it will be easier to see how you may want to use them in future apps. The book AutoHotkey Applications highlights practical scripts for using theses AutoHotkey GUI commands.
Quick and Handy AutoHotkey GUI Windows
Not including commands such as Menu and SplashImage, there are over 20 GUI controls available in AutoHotkey. The ones listed here are in semi-random order based on their use in various scripts. Many such as the Edit control and Text control are commonly combined with other more flexible GUIs. Information on the scripts which use the GUIs is included.
MonthCal GUI Control
One of the coolest GUIs is a pop-up calendar called MonthCal (see Figure 1). It automatically handles calendar functions allowing you to quickly zoom to different months and years. Its output is the selected date.
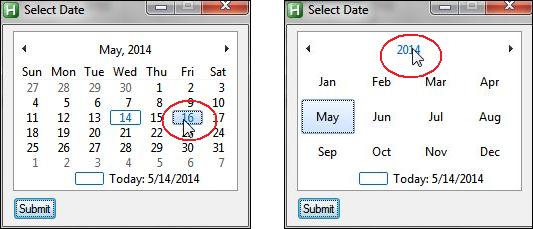
Figure 1. The MonthCal GUI control makes it easy to work with dates in AutoHotkey scripts. Click Submit to use the selected date.
• AddDate.ahk and AddDate.exe give an example of the MonthCal control with more information at included in the book A Beginner's Guide to AutoHotkey. Two hotstrings are found in Chapter Twenty-six of the book AutoHotkey Applications, the second of which demonstrates how to use the MonthCal GUI window.
ListView, Text, Edit, and Button GUI Controls with Right-click Menus
The ListView GUI control is one of the most powerful AutoHotkey controls with the capability of adding right-click menus to its rows (see Figure 2). Text, Edit, and Button controls are commonly used in many GUIs.
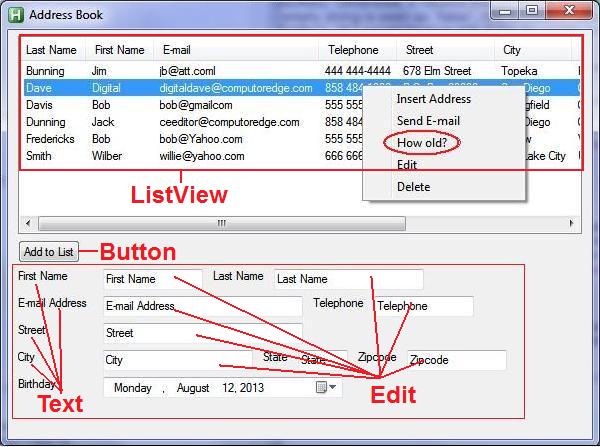
Figure 2. The ListView control is used in conjunction with Text, Edit, and a Button control to build an address book app.
• AddressBook.ahk and AddressBook.exe in AddressBook.zip are the subject of the "Windows Address Book App" in Chapter Eleven and Chapter Twelve of AutoHotkey Applications demonstrating the power of the ListView GUI window.
A personal address and data book which uses AutoHotkey ListView to display entries. Right-click on entry to send e-mail, insert the address in any document, or calculate ages.
DateTime GUI Control
Similar to the MonthCal control, the DateTime control which appears all on one line will input both time and date, but has an optional dropdown calendar (see Figure 3).
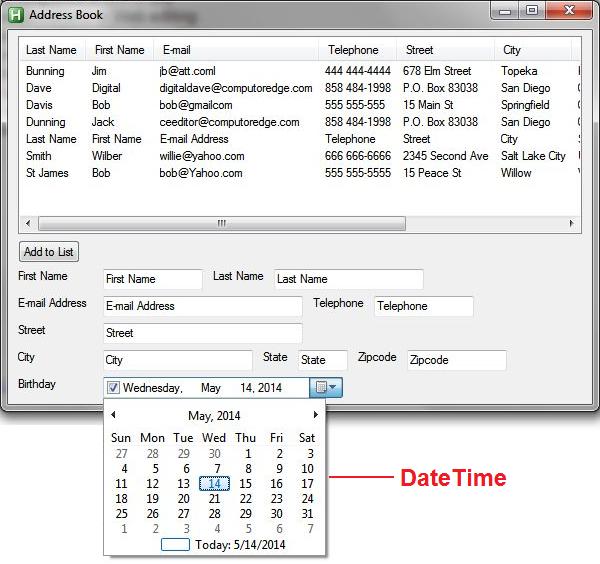
Figure 3. This DateTime control uses the optional dropdown input calendar.
• CalorieCount.ahk and CalorieCount.exe in CalorieCount.zip "A Windows Calorie Counting App" discussed in the AutoHotkey Applications book also uses ListView and the DateTime control (see Figure 4).

Figure 4. Both ListView and the DateTime control are used in this AutoHotkey calorie counting script.
This example of a ListView GUI window accesses the Web page caloriecount.about.com to pull in selected food data including serving amounts and calorie counts. It automatically tracks daily calorie totals.
Progress and UpDown GUI Controls
The Progress GUI control and UpDown control are used in this EggTimer script (see Figure 5). The Progress bar moves to the right as the time is counted down. The UpDown control is used in conjunction with Edit controls to increment numbers in the Edit field.
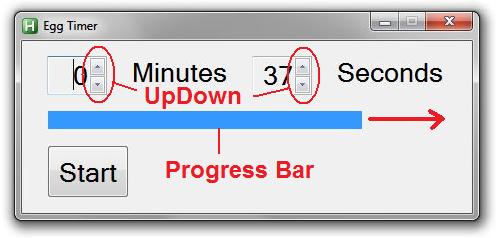
Figure 5. The EggTimer script uses both the graphic Progress bar to show time passing and the UpDown control to input even minutes and seconds.
• EggTimer.zip contains EggTimer.ahk and EggTimer.exe are discussed in "Chapter Seven: The Perfect Soft Boiled Egg" of the AutoHotkey Applications book.
The EggTimer app uses the UpDown control and the Progress Bar control in a GUI window as a timer (after loading, press CTRL+F12). Set the desired time interval, then click Start. The time counts down to zero in the edit windows while a progress bar works its way from left to right. Once the countdown increments to zero, a bell rings, the computer voice says "Your eggs are ready!", and a window pops up with the same message. Now you have the perfect soft boiled egg.
Hotkey GUI Control
The Hotkey GUI control is similar to an Edit control except only possible hotkey combinations are allowed (see Figure 6). This is useful for setting up hotkeys while a script is running such as the Instant Hotkey app below. The WIN key (
 )
is not allowed in the Hotkey field.
)
is not allowed in the Hotkey field.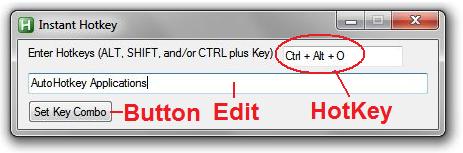
Figure 6. The Instant Hotkey script uses the Hotkey GUI control to set up hotkey combinations for entering the text added to the Edit field.
• InstantHotkey.ahk, InstantHotkey.exe, and InstantHotkey.zip discussed in "Chapter Four: A Free Windows App for Temporary Hotkeys" of AutoHotkey Applications uses the Hotkey GUI control to set up temporary hotkey combinations for entering text in documents and Web pages.
The InstantHotkey script quickly sets up temporary hotkey combinations for adding repeated and/or long lines of text to any current Windows document or Web editing field. This is handy for those situations where you know that you will be using a particular term or set of terms a number of times. The window to set up the hotkey opens immediately when the script is loaded. After the combination is set, it can be changed by right-clicking on the icon in the System Tray and selecting ShowHotkey. Hovering over the same icon will display the current hotkey combination setting in the ToolTip.
Picture GUI control
The Picture GUI control is used to add graphic images to a GUI pop-up (see Figure 7).
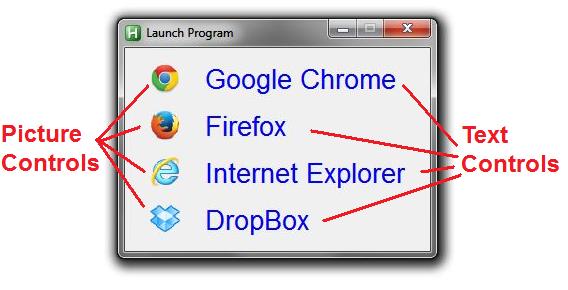
Figure 7. The Picture GUI control and Text GUI control is used to make launching buttons for applications.
• LaunchWindow.ahk and LaunchWindow.exe included in the book Digging Deeper into AutoHotkey.
The LaunchWindow script is a demonstration of how AutoHotkey GUI windows and controls can be used to build a tailored Start pop-up menu window for any version of Windows—including Windows 8 and 10. LaunchWindow uses the hotkey combination CTRL+WIN+L to open the pop-up.
TreeView GUI Control
Similar to the navigation pane of Windows Explorer the TreeView GUI control has many features similar to the ListView control and is often used in conjunction with it. In the example below, TreeView is used with Edit to create a Recipe Book that pops open to the list of ingredients (see Figure 8).
• RecipeTree.zip "Chapter Seventeen: Building a Recipe Book with AutoHotkey, Part I: AutoHotkey Script Development with TreeView Control" of AutoHotkey Applications and five more chapters cover the development of the Recipe Book script demonstrating an alternative application with the TreeView AutoHotkey GUI control.
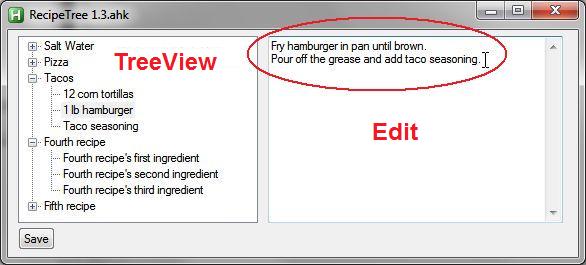
Figure 8. This Recipe Book script uses TreeView to list recipes and ingredients. The preparation steps are stored by the Edit control on the right.
Slider and StatusBar GUI Controls
The Slider GUI control simulates an analog control for setting a range of values (see Figure 9). The StatusBar GUI control adds a display at the bottom of a GUI window for showing app information. The StatusBar can also be turned into a hot button area.
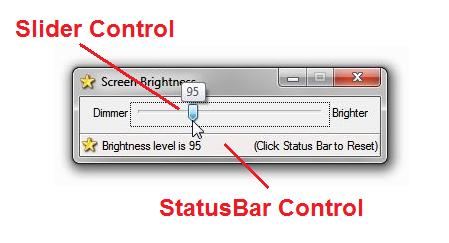
Figure 9. As the Slider control is moved with the left mouse button the value is reflected in the StatusBar control and a ToolTip message. Click the StatusBar control to reset the brightness to the default.
• ScreenDimmer.zip discussed in "Chapter Eight: A Slider App for Dimming the Computer Screen and Adding a StatusBar to the ScreenDimmer App" of AutoHotkey Applications demonstrates both the Slider control and the StatusBar control in a GUI which dims the computer screen. The second part of the chapter adds the AutoHotkey StatusBar which can reset the screen control, plus a one-click pop-up in the System Tray.
DropDownList GUI Control
The DropDownList GUI control creates a dropdown menu of items (see Figure 10). In this case the DropDownList menu is loaded with open windows.
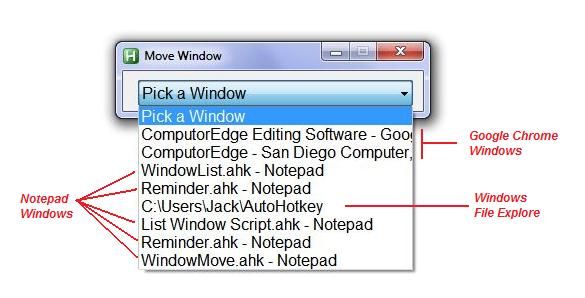
Figure 10. This DropDownList shows open windows. Selecting one will bring it into view on the Desktop.
• WindowList.ahk "Finding Lost Windows with AutoHotkey"—included in the book Digging Deeper into AutoHotkey.
The idea for the WindowList script was inspired by a reader wanting to bring lost (off-screen) windows back in view. This script creates a DropDownList menu from all the open windows (CTRL+WIN+L to activate after load). The list is filtered to avoid Windows system windows. When a window is selected from the menu, it is activated and positioned on top near the upper left-hand corner of the screen.
• WindowMove.ahk "Snapping Windows (Part 1)" and "Snapping Windows (Part 2)"—included in the book Digging Deeper into AutoHotkey.
A window manipulation script which also uses the same DropDownList GUI control, WindowMove is a demonstration app similar to Aero Snap. When the hotkey combination CTRL+WIN+M is activated, the script creates a dropdown list of moving and sizing options for the last active window. It only moves that last window activated. To move another window the menu must be closed, the new windows selected, then CTRL+WIN+M.
For the following GUI controls, the examples come directly from sample scripts on the Web at the AutoHotkey site. While they are not used in one of my specific application, seeing them may inspire other scripts.
The Checkbox GUI
The Checkbox GUI toggles on and off with each click. It's designed for making specific selections—often times multiple (see Figure 11).
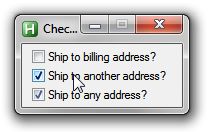
Figure 11. The Checkbox control allows individual items to be checked.
The Radio GUI
The Radio GUI is used to set up a group of selection options (see Figure 12). When one radio button is clicked, the remaining buttons will be deselected. If multiple selections are needed, the CheckBox GUI is a better option.
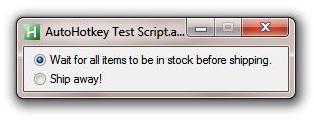
Figure 12. AutoHotkey Radio Button GUI.
The ComboBox GUI
The ComboBox GUI is similar to the DropDownList except it allows adding text input rather than always forcing a menu selection (see Figure 13).
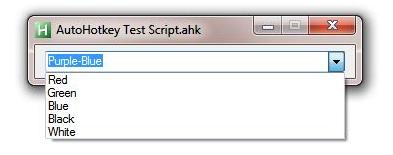
Figure 13. AutoHotkey ComboBox GUI.
In Figure 13, "Purple-Blue" has been typed in rather than selected from the menu
The ListBox GUI
As the name states, the ListBox GUI is a box containing a selection list (see Figure 14). When using the "multi" parameter, multiple selections can be made. The "sort" parameter alphabetically sorts the contents of the list. When the list is longer than the height of the box, scroll bars automatically appear.
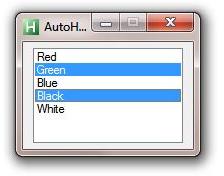
Figure 14. An example of the ListBox GUI control.
The ListBox is a good alternative to DropDownList when there is a large number of selection items, yet you want to limit the screen space taken up by the control. Also, unlike the DropDownList, ListBox does not pop up when clicked nor close when it is not the focus.
The GroupBox GUI
The GroupBox GUI is a container for formatting other controls (see Figure 13). The code for creating the panel in Figure 13 is a bit more complex, although when broken down line by line, it is merely a long list of simple commands.
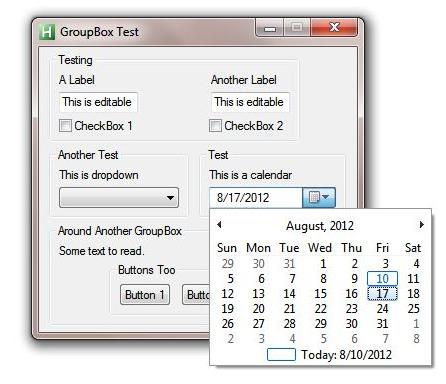
Figure 15. AutoHotkey GroupBox GUI.
GroupBox is distinguished by the light outline of the box. Other controls are placed inside relative to its upper left-hand corner. This way an entire box full of controls can be moved by changing the coordinates of the GroupBox. The GroupBox control was also used in the Calorie Counting script included in the AutoHotkey Applications book.
Tab2 GUI Control
The Tab2 GUI control is used when there are various sets of data (or controls) which may fit into a three-dimensional array or be place under tabs to save space (see Figure 14). Under each tab there is a two-dimensional set of items. The code for the routine in Figure 14 opens another window displaying the results when the "Test" button is clicked.
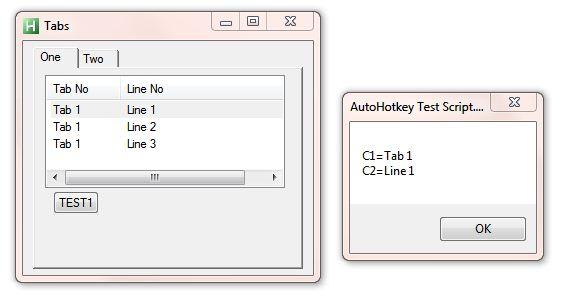
Figure 16. AutoHotkey Tab GUI.
So Many GUI Controls
It's a little overwhelming for new programmers to look at so many GUI controls all at once. It's difficult to remember which GUI does what. Yet, I've found that this type of pictorial overview is a tremendous help in the long run. One day when working on a particular script, the right GUI—which has been languishing in the back of your mind—will pop to the front, helping to create the perfect solution. Writing scripts (or programming) is not about knowing every element of a language by heart—it's knowing where to look for those solutions when you need them.
Other Graphical Commands
While the list above only includes GUI controls, there are other commands for pop-up windows or menus. In particular, the Menu command creates pop-up menu structure, the MsgBox command is commonly used for pop-up info and decision windows, and SplashImage creates a pop-up.
The scripts that I've written are posted at the ComputorEdge AutoHotkey Free Scripts and Apps site. Many of these scripts are discussed in detail in the e-book AutoHotkey Applications available at ComputorEdge E-Books and Amazon.
AutoHotkey Books from ComputorEdge E-Books
AutoHotkey Tricks You Ought To Do With Windows! This e-book includes both those tips and the reference material (Table of Contents and indexes) from the other three AutoHotkey books. Pick up a copy free and share it with your friends.
* * *
 The third edition with more chapters,
tips
and an index to the AutoHotkey commands found in the book is available
in e-book format from Amazon (and other formats—EPUB and PDF— at the
ComputorEdgeBooks Web site linked below). Jack's A Beginner's Guide to AutoHotkey, Absolutely the Best
Free Windows Utility Software Ever!: Create Power Tools for Windows XP,
Windows Vista, Windows 7 and Windows 8 (preferred, EPUB format for iPad,
Android, and computers; MOBI for Amazon Kindle; and PDF for printing)
offers a gentle approach to learning AutoHotkey. (Also available from Amazon for
the Kindle and Kindle software on other devices.)
The third edition with more chapters,
tips
and an index to the AutoHotkey commands found in the book is available
in e-book format from Amazon (and other formats—EPUB and PDF— at the
ComputorEdgeBooks Web site linked below). Jack's A Beginner's Guide to AutoHotkey, Absolutely the Best
Free Windows Utility Software Ever!: Create Power Tools for Windows XP,
Windows Vista, Windows 7 and Windows 8 (preferred, EPUB format for iPad,
Android, and computers; MOBI for Amazon Kindle; and PDF for printing)
offers a gentle approach to learning AutoHotkey. (Also available from Amazon for
the Kindle and Kindle software on other devices.)Building Power Tools for Windows XP, Windows Vista, Windows 7 and Windows 8, AutoHotkey is the most powerful, flexible, free Windows utility software available. Anyone can instantly add more of the functions that they want in all of their Windows programs, whether installed on their computer or while working on the Web. AutoHotkey has a universality not found in any other Windows utility—free or paid.
Originally based upon the series of articles in ComputorEdge, Jack takes you through his learning experience as he explores writing simple AutoHotkey scripts for adding repetitive text in any program or on the Web, running programs with special hotkeys or gadgets, manipulating the size and screen location of windows, making any window always-on-top, copying and moving files, and much more. Each chapter builds on the previous chapters.
For an EPUB (iPad, NOOK, etc.) version of A Beginner's Guide to AutoHotkey click here!
For a PDF version for printing on letter size paper for inclusion in a standard notebook of A Beginner's Guide to AutoHotkey click here!
* * *
 Jack's second AutoHotkey book, Digging Deeper Into AutoHotkey (preferred, EPUB format for iPad,
Android, and computers; MOBI for Amazon Kindle; and PDF for printing)
is comprised of updated, reorganized and indexed columns from ComputorEdge is now available. Since the columns
were not all written in a linear fashion, the book has been reorganized
and broken up into parts by topic. The book is not for the complete
beginner since it builds on the information in A Beginner's Guide to AutoHotkey. However, if a person is reasonably
computer literate, they could go directly to this book for ideas and
techniques without the first book. (Also available from Amazon for
the Kindle and Kindle software on other devices.)
Jack's second AutoHotkey book, Digging Deeper Into AutoHotkey (preferred, EPUB format for iPad,
Android, and computers; MOBI for Amazon Kindle; and PDF for printing)
is comprised of updated, reorganized and indexed columns from ComputorEdge is now available. Since the columns
were not all written in a linear fashion, the book has been reorganized
and broken up into parts by topic. The book is not for the complete
beginner since it builds on the information in A Beginner's Guide to AutoHotkey. However, if a person is reasonably
computer literate, they could go directly to this book for ideas and
techniques without the first book. (Also available from Amazon for
the Kindle and Kindle software on other devices.)For an EPUB (iPad, NOOK, etc.) version of Digging Deeper into AutoHotkey click here!
For a PDF version for printing on letter size paper for inclusion in a standard notebook of Digging Deeper into AutoHotkey click here!
* * *
 Jack's third AutoHotkey book AutoHotkey Applications (preferred, EPUB format for iPad,
Android, and computers; MOBI for Amazon Kindle; and PDF for printing)
is an intermediate level book of ideas and applications based primarily
on the AutoHotkey GUI command. The book emphasizes practical
applications. The book is not for the complete beginner since it builds
on the information in the other two books. However, if a person is
reasonably computer literate, they could go directly to this book for
ideas and techniques without the other books. There is an extensive
index to the ideas and techniques covered in the back of the book.
(Also available from Amazon for
the Kindle and Kindle software on other devices.)
Jack's third AutoHotkey book AutoHotkey Applications (preferred, EPUB format for iPad,
Android, and computers; MOBI for Amazon Kindle; and PDF for printing)
is an intermediate level book of ideas and applications based primarily
on the AutoHotkey GUI command. The book emphasizes practical
applications. The book is not for the complete beginner since it builds
on the information in the other two books. However, if a person is
reasonably computer literate, they could go directly to this book for
ideas and techniques without the other books. There is an extensive
index to the ideas and techniques covered in the back of the book.
(Also available from Amazon for
the Kindle and Kindle software on other devices.)For an EPUB (iPad, NOOK, etc.) version of AutoHotkey Applications click here!
For a PDF version for printing on letter size paper for inclusion in a standard notebook of AutoHotkey Applications click here!
* * *
 This
Beginner's Guide to
Using Regular Expressions in AutoHotkey
is not a beginning level AutoHotkey book, but an introduction to using
Regular Expressions in AutoHotkey (or most other programming
languages). To get the most from this book you should already have a
basic understanding of AutoHotkey (or another programming language).
Regular Expressions (RegEx) are a powerful way to search and alter
documents without the limitations of most of the standard matching
functions. At first, the use of RegEx can be confusing and mysterious.
This book clears up the confusion with easy analogies for understanding
how RegEx works and examples of practical AutoHotkey applications.
"Regular Expressions in AutoHotkey" will take you to the next level in
AutoHotkey scripting while adding more flexibility and power to your
Windows apps. (This book is also available
at Amazon.com)
This
Beginner's Guide to
Using Regular Expressions in AutoHotkey
is not a beginning level AutoHotkey book, but an introduction to using
Regular Expressions in AutoHotkey (or most other programming
languages). To get the most from this book you should already have a
basic understanding of AutoHotkey (or another programming language).
Regular Expressions (RegEx) are a powerful way to search and alter
documents without the limitations of most of the standard matching
functions. At first, the use of RegEx can be confusing and mysterious.
This book clears up the confusion with easy analogies for understanding
how RegEx works and examples of practical AutoHotkey applications.
"Regular Expressions in AutoHotkey" will take you to the next level in
AutoHotkey scripting while adding more flexibility and power to your
Windows apps. (This book is also available
at Amazon.com)