If all you want is a quick overview of AutoHotkey, check out this Web page => "Introduction to AutoHotkey."
Installing AutoHotkey and Writing Your First Script
 AutoHotkey
is a scripting language
which can make
almost everything easier on Windows computers. It can be a simple
one-line script in a text file which enters your e-mail address after
only typing a couple of characters (i.e. "m@" when typed becomes
"myemailaddress@mymailserver.com"). There are some power apps which can
make your computer life much easier. For
example:
AutoHotkey
is a scripting language
which can make
almost everything easier on Windows computers. It can be a simple
one-line script in a text file which enters your e-mail address after
only typing a couple of characters (i.e. "m@" when typed becomes
"myemailaddress@mymailserver.com"). There are some power apps which can
make your computer life much easier. For
example:• Autocorrect over 5,000 commonly misspelled words in any Windows program or on the Web.
• Set a reminder for a later meeting.
• Use QuickLinks to replace the missing Windows 8 Start Menu (or just to make life easier in any version of Windows).
Or, check out the many of examples throuigh the links at "Free AutoHotkey Scripts and Apps."
Download the FREE AutoHotkey e-book AutoHotkey Tricks You Ought to Do with Windows! Available in EPUB, Amazon MOBI, and PDF formats. Get all three!
Installing AutoHotkey
I noticed that the CNET download of AutoHotkey attempts to add another unwanted utility to your computer (and is probably out-of-date), so I recommend that you do a direct download from this AutoHotkey Web site (which is considered the most up-to-date version). I did this without getting any annoying extra toolbars or utilities.
When installing AutoHotkey, virtually everything is automatic, as shown in Figure 1. When using Express Installation, the installer adds everything that you will need to get started.

Figure 1.In most cases, you will want to use the Express Installation.
 Once you've installed
the latest version of AutoHotkey, you're ready to
get started.
Once you've installed
the latest version of AutoHotkey, you're ready to
get started.Version 2.0 Note: AutoHotkey 2.0-a is a release of AutoHotkey in the alpha stage of development. The goal is to clean up many of the redundant and confusing aspects of the current version. However, there may be a considerable loss of backward compatibility when using 2.0. (Many scripts found on the AutoHotkey sites will not run properly.) For now, it is recommended that new users stick with the current 1.1 release.
Writing an AutoHotkey Script
As with most script writing (programming) the basic file for writing code is a text file. Any text editor will do, although I recommend using Notepad++ which is one of my favorites referenced in Jack's Favorite Free Windows Programs. However, for the purposes here, Notepad which is the AutoHotkey default editor and included with Windows will do just fine.
To create your first script file, right-click on any open area of the Desktop. Select New => AutoHotkey Script from the menu (see Figure 2).
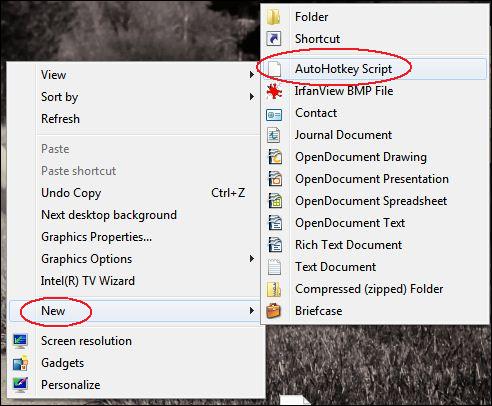
Figure 2. Create a new AutoHotkey script by right-clicking on the Windows Desktop.
A new file will be created with the name "New AutoHotkey Script.ahk" (see Figure 3). At this time you should change the name to something that will denote the purpose of the new script. In this case using "test.ahk" will work fine.
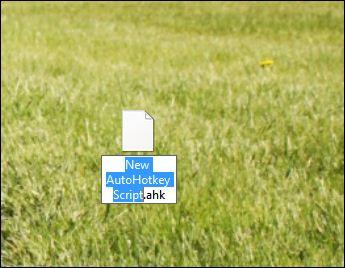
Figure 3. A new AutoHotkey file (AHK) is created on the Windows Desktop.
AutoHotkey scripts use the .ahk extension. If the .ahk does not appear at the end of the file name, the script will not automatically invoke the main program for activation. This is how the computer system recognizes AutoHotkey scripts.
To write your first script, right-click on your new file and select Edit Script from the menu (see Figure 4). The script will open in your default text editor (in most cases Windows Notepad).
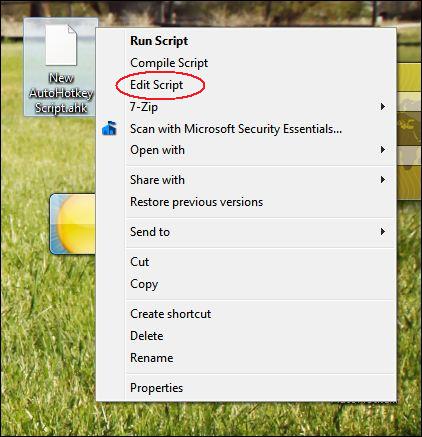
Figure 4. Right-click on the file icon and select Edit Script from the menu to open the script in the default text editor.
The new script file will contain standard preliminary code, as shown in Figure 5. You can edit this information (Author), but for our purposes it's not necessary to make any changes. (Lines which start with a semicolon ";" are comments and do not affect the running of the script.) The lines at the bottom are AutoHotkey commands, but I have not yet investigated them. Based on the comments next to each command, it seems that they are good things to keep, so I left them as they are.
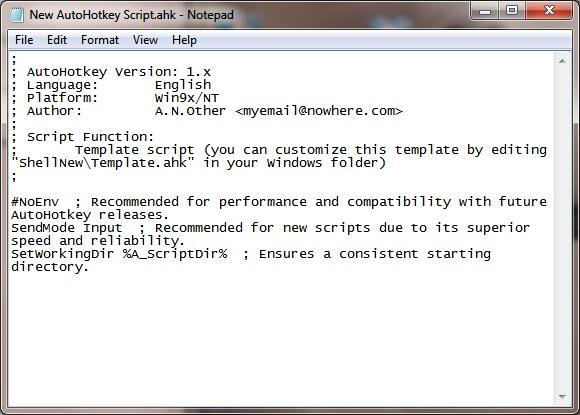
Figure 5. The new AutoHotkey script contains boiler plate text added by the main program when the new file was created.
The next step is to add the code which will create the hotkeys. In Figure 6, four different sets of code have been added to the script. Each section outlined in red activates a unique hotkey feature. They can be added to the script and tested individually or added all at once. (You can cut-and-paste the individual lines of code from the explanations below. It is important that the code (syntax) be exactly as it is shown or the hotkey will not operate properly.)

Figure 6. Four sets of code have been added to the script to perform the following functions: 1. Open a Google search in the default Web browser; 2. Launch Windows Notepad and return a message when it is closed; 3. Launch the Windows Calculator; 4. Convert "imho" to "in my humble opinion" anywhere it is typed.
Hotkey 1: Open a Google search with the default Web browser.
#space::Run www.google.comThe number symbol (#) represents the Windows key (
 ).
The word "space" is the space bar. The hotkey is represented by the
symbols which appear before the double colon (::). In this case #space
means hold down the Windows key ()
and hit the space bar. The Google search screen will be opened in the
default Web browser.
).
The word "space" is the space bar. The hotkey is represented by the
symbols which appear before the double colon (::). In this case #space
means hold down the Windows key ()
and hit the space bar. The Google search screen will be opened in the
default Web browser.Hotkey 2: Open Windows Notepad; return a message when Notepad is closed.
#n::Again, the number symbol (#) represents the Windows key (
RunWait Notepad
MsgBox The user has finished (Notepad has been closed).
return
).
The "n" is the letter n on the keyboard. In this case #n means hold
down the Windows key ()
and hit the letter "n" on the keyboard.This is an example of combining a number of commands into one script to be run sequentially. This is done by putting the hotkeys and the double colons on a separate first line (#n::). The following lines are executed in order when the hotkey combination is invoked. First Windows Notepad will open (RunWait), but the remainder of the script will wait until Notepad is closed. When Notepad is closed the message displayed is "The user has finished (Notepad has been closed)." The command "return" indicates the end of that routine and is required for every group of commands formatted in this manner.
Hotkey 3: Open the Windows Calculator.
^!c::Run calc.exeThe up-arrow symbol (^) represents the Control key (CTRL). The exclamation point (!) represents the Alt key (ALT). The "c" is the letter c on the keyboard. The hotkey is represented by the symbols which appear before the double colon (::). In this case ^!c means hold down the Control key, plus the Alt key and hit the letter "c" on the keyboard. The Windows Calculator will open.
Hotkey 4: Change "imho" to "in my humble opinion" whenever typed.
::imho::in my humble opinionThe code for this type of simple real-time substitution ("in my humble opinion" is added when "imho" is typed in any editing program or field) always starts with the double colon (::). The first group of letters are the hotkeys and the second group of letters following the second double colon (::) is the text which replaces the first group. It is activated when the first group is typed, followed by a terminating character such as a space, period (.), comma (,), quote marks, etc.
After you have added the new code to the AutoHotkey script, save the file.
Activating a AutoHotkey Script
When you have saved your new AutoHotkey script, you can activate it by right-clicking on the Desktop icon and selecting Run Script from the top of the menu (see Figure 7). The hotkey features will be loaded into memory and the functions will activate whenever you use the hotkey combinations.
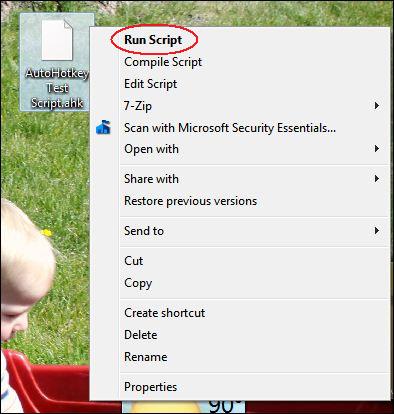
Figure 7. Right-click on the AutoHotkey icon to activate it by selecting Run Script from the menu.
Note: Exercise some care when deciding which hotkey combinations you'll use in your script. In some cases they may override other common Windows hotkeys. In other situations, built-in program hotkeys may take priority over your assigned AutoHotkey hotkeys. For example, if you assign
+E
(#e) to an
AutoHotkey script, the combination will no longer open Windows
Explorer. On the other hand, if you try to use Control+H in an
AutoHotkey script, it will not work in Google Chrome which will
continue to open a History page.After an AutoHotkey script is activated, a green icon containing the letter "H" will appear in the Notification area located at right-hand side of the Taskbar. If you hover over the icon with your cursor the file name of the script will appear (see Figure 8). Each time you activate a new script an additional icon will appear in the Notification area. You can run multiple scripts at the same time.
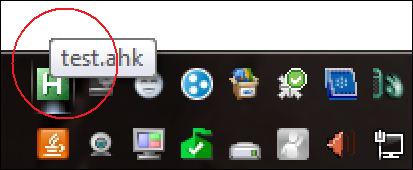
Figure 8. The icon in the Notification area will identify the running AutoHotkey script.
If you would like to deactivate (or reload a newly saved version of) an AutoHotkey script, right-click on the icon in the Notification area and make the appropriate selection (see Figure 9).
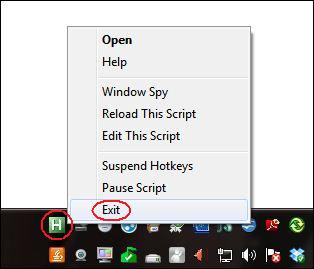
Figure 9. Right-click on the AutoHotkey icon in the Notification area to deactivate (Exit) the script.
This article should contain enough information to help you jump-start your AutoHotkey solutions—even if merely to change "imho" to "in my humble opinion." It should also offer enough insight into the scripting language for users to see how it could benefit them (and save key strokes) in their day-to-day computing. I would encourage everyone to give it a try. It's free and can make your computer work (whether word processing, writing e-mail, Facebook posting, or coding other programs) significantly easier.
For more information and examples get the FREE introduction and overview book AutoHotkey Tricks You Ought to Do with Windows e-book in EPUB for iPad or Android tablets, MOBI for Amazon Kindle, or PDF for printing on notebook size paper from ComputorEdge E-Books.
* * *
This new edition with more chapters and an index to the AutoHotkey
commands found in the book is available in e-book format from Amazon
(and other formats—EPUB and PDF— at the ComputorEdgeBooks Web site
linked below). Jack's A Beginner's Guide to AutoHotkey, Absolutely
the Best Free Windows Utility Software Ever!: Create Power Tools for
Windows XP, Windows Vista, Windows 7 and Windows 8 (preferred,
EPUB format for iPad, Android, and computers; MOBI for Amazon Kindle;
and PDF for printing) offers a gentle approach to learning AutoHotkey.
(Also available from Amazon for the Kindle and Kindle
software on other devices.)Building Power Tools for Windows XP, Windows Vista, Windows 7 and Windows 8, AutoHotkey is the most powerful, flexible, free Windows utility software available. Anyone can instantly add more of the functions that they want in all of their Windows programs, whether installed on their computer or while working on the Web. AutoHotkey has a universality not found in any other Windows utility—free or paid.
Based upon the series of articles in ComputorEdge, Jack takes you through his learning experience as he explores writing simple AutoHotkey scripts for adding repetitive text in any program or on the Web, running programs with special hotkeys or gadgets, manipulating the size and screen location of windows, making any window always-on-top, copying and moving files, and much more. Each chapter builds on the previous chapters.
For an EPUB (iPad, NOOK, etc.) version of A Beginner's Guide to AutoHotkey click here!
For a PDF version for printing on letter size paper for inclusion in a standard notebook of A Beginner's Guide to AutoHotkey click here!
* * *
 Jack's
second AutoHotkey book, Digging Deeper Into AutoHotkey (preferred,
EPUB format for iPad, Android, and computers; MOBI for Amazon Kindle;
and PDF for printing) is comprised of updated, reorganized and indexed
columns from ComputorEdge is now available. Since
the columns were not all written in a linear fashion, the book has been
reorganized and broken up into parts by topic. The book is not for the
complete beginner since it builds on the information in A Beginner's Guide to AutoHotkey.
However, if a person is reasonably computer literate, they could go
directly to this book for ideas and techniques without the first book.
(Also available from Amazon for the Kindle and Kindle
software on other devices.)
Jack's
second AutoHotkey book, Digging Deeper Into AutoHotkey (preferred,
EPUB format for iPad, Android, and computers; MOBI for Amazon Kindle;
and PDF for printing) is comprised of updated, reorganized and indexed
columns from ComputorEdge is now available. Since
the columns were not all written in a linear fashion, the book has been
reorganized and broken up into parts by topic. The book is not for the
complete beginner since it builds on the information in A Beginner's Guide to AutoHotkey.
However, if a person is reasonably computer literate, they could go
directly to this book for ideas and techniques without the first book.
(Also available from Amazon for the Kindle and Kindle
software on other devices.)For an EPUB (iPad, NOOK, etc.) version of Digging Deeper into AutoHotkey click here!
For a PDF version for printing on letter size paper for inclusion in a standard notebook of Digging Deeper into AutoHotkey click here!
* * *
 Jack's
third AutoHotkey book AutoHotkey Applications (preferred,
EPUB format for iPad, Android, and computers; MOBI for Amazon Kindle;
and PDF for printing) is an intermediate level book of ideas and
applications based primarily on the AutoHotkey GUI command. The book
emphasizes practical applications. The book is not for the complete
beginner since it builds on the information in the other two books.
However, if a person is reasonably computer literate, they could go
directly to this book for ideas and techniques without the other books.
There is an extensive index to the ideas and techniques covered in the
back of the book. (Also available from Amazon for the Kindle and Kindle
software on other devices.)
Jack's
third AutoHotkey book AutoHotkey Applications (preferred,
EPUB format for iPad, Android, and computers; MOBI for Amazon Kindle;
and PDF for printing) is an intermediate level book of ideas and
applications based primarily on the AutoHotkey GUI command. The book
emphasizes practical applications. The book is not for the complete
beginner since it builds on the information in the other two books.
However, if a person is reasonably computer literate, they could go
directly to this book for ideas and techniques without the other books.
There is an extensive index to the ideas and techniques covered in the
back of the book. (Also available from Amazon for the Kindle and Kindle
software on other devices.)For an EPUB (iPad, NOOK, etc.) version of AutoHotkey Applications click here!
For a PDF version for printing on letter size paper for inclusion in a standard notebook of AutoHotkey Applications click here!
* * *
 This
Beginner's Guide to
Using Regular Expressions in AutoHotkey
is not a beginning level AutoHotkey book, but an introduction to using
Regular Expressions in AutoHotkey (or most other programming
languages). To get the most from this book you should already have a
basic understanding of AutoHotkey (or another programming language).
Regular Expressions (RegEx) are a powerful way to search and alter
documents without the limitations of most of the standard matching
functions. At first, the use of RegEx can be confusing and mysterious.
This book clears up the confusion with easy analogies for understanding
how RegEx works and examples of practical AutoHotkey applications.
"Regular Expressions in AutoHotkey" will take you to the next level in
AutoHotkey scripting while adding more flexibility and power to your
Windows apps. (This book is also available
at Amazon.com)
This
Beginner's Guide to
Using Regular Expressions in AutoHotkey
is not a beginning level AutoHotkey book, but an introduction to using
Regular Expressions in AutoHotkey (or most other programming
languages). To get the most from this book you should already have a
basic understanding of AutoHotkey (or another programming language).
Regular Expressions (RegEx) are a powerful way to search and alter
documents without the limitations of most of the standard matching
functions. At first, the use of RegEx can be confusing and mysterious.
This book clears up the confusion with easy analogies for understanding
how RegEx works and examples of practical AutoHotkey applications.
"Regular Expressions in AutoHotkey" will take you to the next level in
AutoHotkey scripting while adding more flexibility and power to your
Windows apps. (This book is also available
at Amazon.com) For additional
AutoHotkey books in all formats, visit ComputorEdge E-Books.